Showing posts with label Crafts. Show all posts

First Winds of Autumn by Blackbird Designs | Cross Stitch

First Winds of Autumn
Winds of Autumn
Blackbird Designs

Designed by Barb Adams
Stitched by Brandi Fitzpatrick

Fabric - 36 ct. Vintage Beeswax by R&R Reproductions

Threads - WDW - Amber, Bright Leaf, Chickpea, Cinnamon Twist, Marmalade, Molasses, Palomino, Roasted Fig, Sage, Sweet Potato

Bittersweet September by Blackbird Designs | Cross Stitch

Bittersweet September
Winds of Autumn
Blackbird Designs

Designed by Alma Allen
Stitiched by Brandi Fitzpatrick

Fabric - 32 ct. Vintage Country Mocha

Threads - GA- Autumn Leaves, Chamomile, Endive, Gingersnap, Goldleaf, Heirloom Gold, Tomato, Walnut, Sarsaparilla, Woodtrail

Waiting for the Harvest by Blackbird Designs | Cross Stitch

Waiting for the Harvest by Blackbird Designs

Waiting for the Harvest
Winds of Autumn
Blackbird Designs

Design by Barb Adams
Stitched by Brandi Fitzpatrick

Fabric - 32 ct. natural linen by Zweigart

Threads - WDW Grapevine


Waiting for the Harvest by Blackbird Designs

My Notes

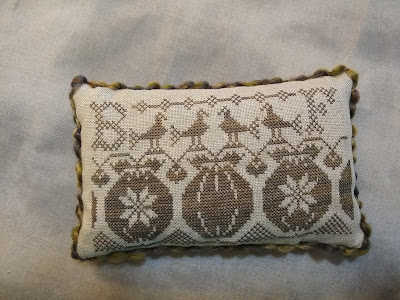
After finishing up October 31st by Blackbird Designs I had leftover fabric and threads so I decided to whip up this beauty. The called for fabric is 32 ct. American Chestnut by R&R Reproductions and the thread is GA Dark Chocolate. But as I said I had leftovers so I used that instead.

Barb includes an alphabet to personalize the piece so I took advantage of that and used my initials instead of hers.

I finished it in the same way that I finished Spell of the Moon by Blackbird Designs. I used leftover fabric for the backing and some mystery yarn for the trim that I just whip stitched on. I'm very happy with how it turned out.


Spell of the Moon by Blackbird Designs | Cross Stitch

Spell of the Moon by Blackbird Designs

Spell of the Moon 
Winds of Autumn
Blackbird Designs

Design by Barb Adams
Stitched by Brandi Fitzpatrick

Fabric - 32ct Natural linen by Zweigart

Threads - 
    CC - Black Coffee
    GA - Harvest Moon
    WDW - Pelican Gray


Spell of the Moon by Blackbird Designs


My Notes

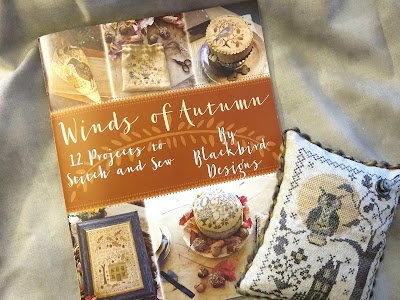
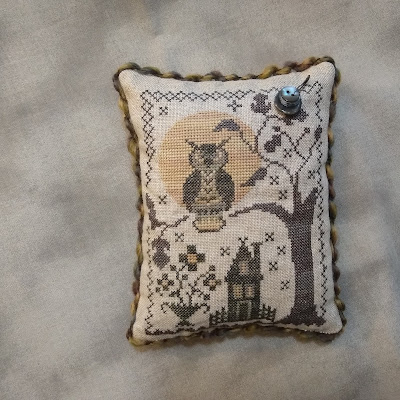
My metal basket on my buffet was in need of a few more fall/Halloween pieces so I decided to turn this into a little pin pillow. The called for fabric was Tin Roof by Weeks Dye Works. I didn't have any on hand so I just used a scrap of natural linen by Zweigart and I like the results. To me Natural linen is a perfect blend of browns and greys. I did have all of the called for threads so I used them.

I used a piece of grey fabric leftover from my October 31 drum that I previously finished. The trim around the edge is some mystery yarn that is in my scrap yarn basket. I personally like to use yarn to finish edges. It's so easy to whip stitch on and I always have something laying around that seems to work. My tip on yarn is to use a drop of glue (like Elmer's) on the ends and they will keep from fraying. 

I also added one of those adorable bulb pins with some buttons just because Helen D. does it so I wanted to as well. I took her advice and ordered a bag off of Amazon so now I have enough bulb pins to do more projects than I ever will in my lifetime!

If you don't have the Winds of Autumn booklet from Blackbird Designs you need to get it. It's just full of wonderful Halloween and Fall pieces.

Happy Stitching!


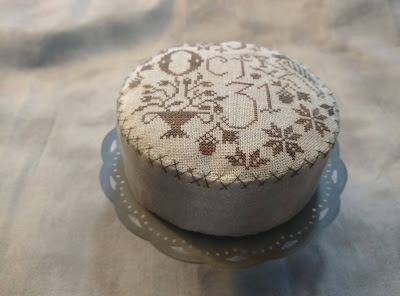
October 31 by Blackbird Designs | Cross Stitch

October 31 by Blackbird Designs

October 31
Winds of Autumn 

Designed by Barb Adams
Stitched and Finished by Brandi Fitzpatrick

Fabric - 32 ct Natural linen by Zweigart

Threads - WDW Grape Vine

October 31 by Blackbird Designs


My Notes

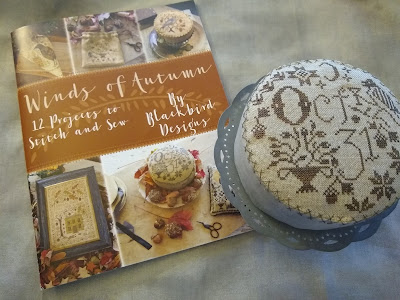
I am so in love with this piece. It's my first finish as a drum. I've always been intimidated by the process but for this one I decided that Barb's finishing instructions sounded doable so I decided to give it a try. 

The linen that was called for was 32ct. Tombstone by R&R Reproductions. My local LNS (Cecelia's Samplers) was out so I just went with a basic Natural linen by Zweigart. The called for thread was Onyx by Gentle Arts. I used Grape Vine by Weeks Dye Works. I thought it went better with the linen and I had it in my stash.

For the finishing fabric I would have loved to use the same as Barb did, but it was a Blackbird Designs fabric that was no longer available. So I just took myself to Hobby Lobby with my stitched piece and found a piece of grey fabric that I thought went nicely. 

October 31 by Blackbird Designs


I pretty much followed the assembly instructions as they were written. I sewed it by hand using a ton of pins to keep everything in place. My advice is to just take your time and it will all come together. At about the halfway point I wasn't sure it would, but it did! I didn't have sawdust to stuff it with so I just used crushed walnut shells.

After everything was sewn together and stuffed I finished it off with the decorative Herringbone stitch along the top seam. I used a strand of  WDW Grape Vine. Let me just say that my Herringbone stitch skills could use some work but I'm happy with how it turned out. By the way I watched several YouTube videos on the stitch to remind myself how it is done. That was helpful but to me it is still an awkward stitch. But it's pretty when it's finished!

I hope this encourages you to give this one a try. If I can finish it you can finish it!

Happy Stitching!


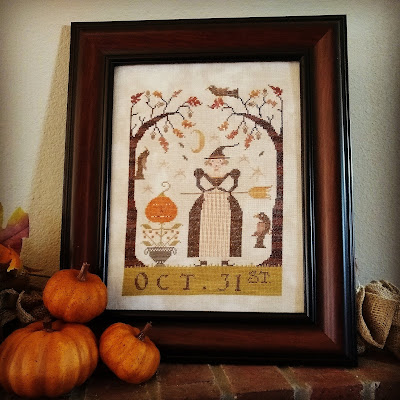
Oct. 31st by Brenda Gervais | Cross Stitch

Oct. 31st by Brenda Gervais

Pattern: Oct. 31st
Designer: Brenda Gervais (With Thy Needle and Thread)
Fabric: 36 ct Legacy linen by Picture This Plus.
Threads: I used the called for threads. Weeks Dye Works - Straw, Tiger's Eye, Pecan, Palomino, Sage, Caper, Pelican Gray and Olive. Gentle Arts - Cinnamon, Woodrose, Walnut, Pumpkin Pie, Toasted Barley, Wood Trail, Toffee and Wheat Fields. Classic Colorworks - Eggshell and Perfect Piecrust. Classic Colorworks Belle Soie Silk - Limestone

Oct. 31st  Designer: Brenda Gervais


She's finally finished! I absolutely love this one. I decided to frame it once it was finished. I took it to be professionally framed but the cost was going to be just over $100. I love her . . . but not that much! So I found a stock frame from Michael's and laced and framed her myself. I'm pleased with the results.

Changes

 I used 32 ct Iced Coffee linen by Fabric Flair. This is my first time using Fabric Flair and I liked it. I stitch in hand and it draped just right. Fabric Flair is a printed fabric and it is printed on one side only. The other side is just white.

I used all of the called for threads with the exception of Limestone (Belle Soie Silk). I substituted Caterpillar from Classic Colorworks.

I stitched one over two which is my choice on 32 ct. I like the rustic prim look and two over two is just too bulky for me.

The only change that I made to the pattern was to add stripes to the apron. I used Gentle Arts Pumpkin Pie and just backstitched the stripes in. My reasoning for this is to help the visual effect. With the called for fabric and the fabric I chose the apron is very close in coloring to the background fabric. It makes the witch's bosom look enormous. (Just glance at the picture and I think you'll see what I mean.) When I added the stripes it changed the perspective. I think it would also work to change background fabric color to one that contrasted with the apron color.

This is a nice sized piece. The frame I used was a 10 x 13. I also think that it would make a cute fall pillow. There aren't any specialty stitches so you could do it on 14 ct aida if that's what you prefer.

Enjoy the stitch!


Got Luck? from Plum Street Samplers | Cross Stitch (free pattern download)


Pattern: Got Luck?
Designer: Paulette Stewart
Company: Plum Street Samplers
Fabric: 14 ct hand dyed mystery fabric
Floss: DMC 580, 581, 3348

I am addicted to Floss Tube and all of the brilliant ideas on there. One of the things that they have made me realize is that I just don't have much seasonal stitching to display. So I decided to rectify that this year. 

One of the other things that I've realized about myself is that I tend to collect all the cute freebie designs from my LNS and the designers' websites but they just go in a file to be forgotten. Well I'm tired of that so I'm going to stitch them up this year! 

Paulette Stewart from Plum Street Samplers puts out some of the most adorable designs. This little piece is a free download on her blog. It's been in my stash for awhile so I decided to stitch it up.

Details, Details, Details

The pattern stitch count is small (44w X 43h) so I decided to turn it into a little pillow for my coffee table tray. I dug through my scrap fabric and found a piece of hand dyed Aida that I'm not really sure about. I know it is 14 count and it's really soft so I am leaning towards it being from Picture This Plus but again I'm not sure. It's got a really pretty variation of pastel greens and yellows so I decided it would be perfect.

The directions tell you to use any fabric you like and three thread colors; two different greens and ecru, or three different greens and no ecru. I chose three different DMC greens. The dark green is 580, medium green is 581, and the light green in place of the ecru is 3348. 

The only thing that I changed on the pattern were the words. The original calls for the words Got Luck? but I charted out our last name instead. My husband's family is Irish so it works for us.

To finish it I chose a coordinating fabric and made a small pillow. I filled it with crushed English Walnut shells. I like that better than poly-fill for my small pillows. It's just a personal preference. I like the weight of it better and they can also be used as a pin cushion.

I'd like to add a little trim around the edges like chenille or something, but I didn't have any that would match in my stash so that may happen later. 

Did You Know?

Okay I may be the last person to realize this, but just in case I'm not, here goes. I've been buying these crushed walnut shells in a small batch at my local quilt store. It's not the cheapest thing to buy it that way but I had no idea. The other day I looked it up online to see if I could order it and have it shipped with Prime. 

Guess what . . . crushed English Walnut shells are also used in the bottom of reptile cages. So I went to our local pet store (Pet Co.) and low and behold they sell this stuff in huge bags for a fraction of the price. Good grief! 

Hope this inspires you to stitch one up for yourself. If you do tag us so we can see your finished project and cheer you on. We're RambleSAHM on all of our social media platforms.

Happy Stitching!


Lantern Lane from Little House Needleworks | Cross Stitch

Lantern Lane by Little House Needleworks

Lantern Lane
Chart No. 134

Designed By: Diane Williams
Fabric: 28 ct Jobelan from Wichelt in Babbling Brook
Floss: Belle Soie silks are the suggested threads with hand dyed cotton alternatives from Weeks Dye Works and Classic Colorworks
Finishing: Thrift Store tray

This piece was such a wonderful journey for me. For the past several years I have really struggled doing anything on linen. In fact I pretty much had given up. I was thinking that I would just be content with using 14, 16, and 18 count fabric. My eyes just wouldn't focus on anything else.

Several years ago I switched to multi-focal contacts that I love. But my eyes really struggle seeing the individual threads. I'd tried a magnifying light and even used reading glasses (+1.50) over my contacts. Nothing seemed to work. Then by a total fluke I stumbled upon a solution.

I accidentally picked up a higher power of reading glasses (+3.50) and I could see the threads. I still can't do linen, something about the slubs in the threads makes it hard to see and I get off too easily. But for now I'm able to use the evenweaves like Lugana and Jobelan. So excited to be able to stitch over two threads again. It makes specialty stitches so much easier!

So Lantern Lane is my first foray back into the world of two over two. It is such a pleasure to work on different fabrics again. If you're struggling too . . . keep looking for what works. You'll find it if you keep trying different things. Just don't give up!

If I Were To Stitch This Again

This pattern lets you choose between Belle Soie silks or hand dyed cotton. I chose the cotton, but it is such a pretty piece that I wouldn't hesitate to do it in silks if I were to do it again.

My only complaint about the over dyed cotton was that the Fawn (WDW) and the Eggshell (CCW) were too close in color. It makes the window sashing and shutters just blend together. I would change the Fawn (WDW) to a slightly darker shade.

I also would sub the Black Coffee (CCW) for DMC 310. I couldn't see enough variation to warrant the use of the more expensive thread. But that Pea Pod (CCW) and the Lancaster Red (WDW) are worth the extra.

I needed two skeins of the Cocoa (WDW), Lancaster Red (WDW), and the Pea Pod (CCW). I don't stitch each individual x as I'm going along. I stitch from bottom left and work over and up. I do a row of half crosses and then come back and cross them. I like the more subtle variation you get that way. So if you are an individual x crosser you may need more thread.

Finishing

To finish this piece off I just dug around in my stash and came up with this tray that I had picked up from a thrift store. I cut a piece of foam board to fit in the bottom. Then I used spray glue and attached a piece of batting to the foam board. Finally I used the lacing method that Brenda Gervais from With Thy Needle and Thread uses. She has a good tutorial here.

By The Way

This was a stitch along (SAL) that used the hashtag #LanternLaneSAL . If you do this piece use that hashtag so we can all see it.

I picked this pattern up at my local needlework shop (LNS). If you don't have an LNS that you use I'm sure mine would love to help you. They are Cecilia's Samplers and they ship all over the states. You can order online or by phone they are the best!

A Very Blessed Christmas Coloring Book by Robin Mead | Adult Coloring Book Review

A Very Blessed Christmas Coloring Book by Robin Mead

Book review disclosure.

Nonfiction / Christmas

There is no better way to get into the full spirit of the holiday season than by coloring more than 85 uplifting illustrations in this special volume: frosty winter scenes, carolers in the snow, trees trimmed in nostalgic trappings, ornate churches, angels, nativities--all reminiscent of cozy moments with family and friends and the sweetest, simplest blessings of the holidays. Each artist can rejoice with a grateful heart and be reminded of the ultimate gift God gave the world. Also included are illustrated Scripture verses and fun, holiday craft cutouts that everyone can use to create their own ornaments, Christmas cards, gift tags, and more!

Inside of A Very Blessed Christmas Coloring Book.

My Thoughts

The coloring trend is such a relaxing way to spend time gathering your thoughts and being creative. A Very Blessed Christmas Coloring Book captures all the sentiments of the season and allows you to express the joyous feelings that surround our celebration of the birth of Christ.

The pages are sturdy and seem to hold up well even though the designs are printed on both sides of the paper. I mostly used colored pencils because it is my favorite choice for coloring books but I think with a little prep (use something like clear gesso) you could even paint the designs. 

I liked that the designs were a mix of very complex patterns and also larger more simple designs. This made the book enjoyable for myself as well as some younger members of the family. Another really fun element of the book is the crafting section at the back. There are several pages that are designed to be colored, glittered, and whatever else you would like to do, and then cut out and made into ornaments or bookmarks. Such a nice way to get the whole family involved.

This would make a wonderful gift for the artist on your list. By itself it is a simple gift or stocking stuffer, but if you add a set of colored pencils it could easily be a complete gift. We enjoyed spending time with it in our family and I think others will as well.

Connect With The Artist


Disclosure of materials.


Hope Through God's Mercy | Bible Art Journaling


One of my favorite Bible Art Journaling groups is Documented Faith. I enjoy Stephanie's whimsical style and her creative expressions. Simply put she inspires me! 

Documented Faith has a monthly word prompt with weekly devotional/journaling prompts. She has amazing products and downloads (some of them are FREE!!!) that I have found to be very thought provoking. I read them each week but I don't always document them. It just depends on what strikes a chord with me.

For the month of July the word is PATIENCE and this week's verse is Lamentations 3: 25-26. 


When I'm studying I like a bit of context so I like to read the entire chapter rather than a single verse. Lamentations is thought to be written by the prophet Jeremiah. Poor Jeremiah isn't very popular among his people. His call to turn back to the Lord has been falling on deaf ears.

The chapter begins with Jeremiah's lament of suffering God's wrath. (Lamentations 3:1-20) Even though Jeremiah is faithful to God he is still subject to all the calamity that is happening. This portion is a good reminder to us that we live in a fallen world and even though we ourselves may head the call of God we don't always escape the consequences of a society that doesn't.

Living in America in recent days, I can completely relate to Jeremiah. With all the craziness in the news it can sometimes feel like there is no hope. But then we come to the next portion that just makes me smile:
"Yet I call this to mind, and therefore I have hope: Because of the LORD's faithful love we do not perish, for His mercies never end. They are new every morning: great is Your faithfulness! I say: The LORD is my portion therefore I will put my hope in Him. The LORD is good to those who wait for him, to the person who seeks Him. It is good to wait quietly for deliverance from the LORD." Lamentations 3:21-26
After that how could you not be encouraged? I envision Jeremiah stiffening his spine, taking a deep breath, and thinking, "Okay, with God's help we can go forward." In Lamantations 3:28-30 Jeremiah seems to be saying that we may be suffering but we must do it with patience. He tells his people that they need to be silent and reflect on God's commands. They also need to be quiet rather than speak in anger and finally they need to turn the other cheek. Not one of these things are easy. In fact my Bible's commentary  says that "Each tactic is increasingly difficult, and each raises the hope that God will deliver his people from trouble."

Lamentations 3:31-33 give us three reasons to hope. (1) The Lord will not reject His people forever. (2) God will show compassion according to His faithful love of us. (3) God doesn't enjoy bringing affliction or suffering on people.

The next several verses remind us that God is over all and He controls it all. I don't know about you, but I find great comfort in that fact alone. I may think I want to control my surroundings but in reality I know that I am only safe when I rest in the hand of God.

The rest of the chapter continues on in the same pattern reminding us that we must examine ourselves and our motives. We must return to the LORD and repent of our wicked ways. Over and over we are reminded that there is hope through God's mercy.


For further study and reflection I would invite you to download the Documented Faith Week 29 devotional. I know I have benefited from the time of reflection and I think you will too.

Bible Art Journaling & Notetaking With The HCSB Notetaking Bible


Holman Bible Staff
Bible 

The HCSB Notetaking Bible is designed to enhance personal Bible study as well as preparation for teaching and preaching. The Bible contains the full text of the Holman Christian Standard Bible in a single-column setting. Abundant space is provided with a 1.75 inch note taking space on each page to make observations, record insights, raise questions, and suggest to yourself additional exploration of the text. The Bible includes a 40-page concordance, eight four-color maps, a one-year Bible reading plan, presentation page, and an introduction to the Holman Christian Standard Bible.


My Thoughts

For years now I have been marking up my Bibles with notes and highlights and scraps of paper. But let's face it, you can only keep so many extra pieces of paper or sticky notes in your Bible before it causes the spine to break down.

More recently I have begun Bible Art Journaling. The first Bible I started in didn't have very wide margins and it was a bit of a challenge, so I did a lot of tip-ins. Again not the best solution because it eventually does a number on your spine.


You can just imagine my delight when I discovered the HCSB Notetaking Bible. The margins are wide enough to illustrate or make notes next to the very passage I am concentrating on.

The margins are lightly lined so it is easy to make notes that are legible and not wonky. It's also easy to cover the lines with art work. The ink used is a faded grey so it doesn't interfere with your doodles.


I've had success with colored pencils, watercolor, acrylic paint, and micron pens. There is little to no bleed through onto the adjoining page. The pages are thin but sturdy. 

The font is small but still readable. I'm pleased with the overall size of the Bible. With such wide margins and single column text it still is a very portable book. I've carried it with me to church and haven't found it unwieldy. 


The Bible nerd in me loves all of the extra features. There are colorful maps and a wonderful daily reading plan that has boxes to check when you've finished reading the particular passage. I'm a list maker - box checker so this pleases me. Such a nice sense of accomplishment is achieved when you look back at all of the passages that you have completed. 

My favorite extra feature is the concordance. It is quite complete. I'm used to anemic ones that force you to look up what you need elsewhere, but this one is very extensive. 

Whether you are a notetaker or Bible art journaler or a combination of both, I think you will find the Notetaking Bible to be to your liking.  


Life Verse Creative Journal Set by Jana Magruder & Morgan Grace Magruder | Coloring Book Review


Jana Magruder & Morgan Grace Magruder
Coloring Book

Are you ready to discover your life verse?

Choosing a life verse from Scripture is a powerful way to aim your steps toward God. This two-pack of beautiful journals (64 pages each) will guide you to choose a life verse and to make it your own!

Journal One contains fifteen verses explored through text and journaling prompts, combined with beautiful line-art illustrations for you to color and make your own. Journal Two is blank and ready for your imagination, your art, and your story!


My Thoughts

In just about every retail store there is a section dedicated to coloring books designed for adults. I've doodled in several of them but up until now I've only been a little ho hum about them. Most of the ones that I've colored in have been rather large. I was really looking for something that would be a bit more portable.

The Life Verse Creative Journal Set is a perfect match for me. Both books are about 5x7" and can tuck easily into your purse. I personally carry my copy in my Fauxdori. It's nice to have something to doodle in while waiting or riding in a car.

The content is fabulous. The overall design is to help you choose a life verse. I have no idea if at the end I'll have solidified that concept for myself but I sure am enjoying doodling the different verses that are featured. I enjoy Bible Art Journaling and this little journal has sparked some new ideas for me. I find that by focusing on a particular verse and coloring the artwork I pretty much have the verse memorized by the time I finish the page. That is a wonderful bonus for me!

If you have someone that loves to doodle or is into Bible Art Journaling, this set would make a wonderful gift. I also think it would make a wonderful gift to yourself. I know I'm enjoying my set.

Connect With The Author


Stars & Stripes | Patriotic Painting Project


Karla Dornacher is one of my favorite artists. She has such a fun and whimsical style with beautiful color combinations. Plus, her designs just lift my soul and help me turn my art endeavors into a form of worship. 

This year to celebrate the 4th of July holiday she posted this wonderful coloring page on her blog and invited us all to download it and color it ourselves. (If you hurry you can download it for free until July 5th.)

In her original piece Karla used a combination of colored pencils. I had already been working on a different patriotic piece and had a palette of acrylic paint out on my paint table so I decided to just use what I had. 

I printed out two copies of the pattern. The first I printed on regular drawing paper so I can give the colored pencils a try later on. I'm pretty new to colored pencils but I'm enjoying the learning curve. 

On her website Karla gives a list of the colored pencils that she used. I found this very helpful because I love her color choices!

I also printed a copy of the pattern on watercolor paper so I could paint it with what I was already working on. I used DecoArt Americana Acrylic paints for my palette and used a watercolor technique. I like to do that when I'm working with a pen & ink type of project.


Here's the details for my version:

Palette
DecoArt Americana Acrylic Paint
Blues - Victorian Blue (basecoat), Deep Midnight Blue (shade), Turquoise Blue (highlight), Whispering Turquoise (stars and added highlights)
Whites - Light Buttermilk (basecoat), Raw Sienna (shade), Warm White (highlight)
Reds - Country Red (basecoat), Napa Red (shade), Red Alert (highlight)
Angel's Skin - Flesh Tone and shade with Raw Sienna

Brushes
Loew-Cornell
7020 LaCornelle Round #4
7400 LaCornelle Angle Shader 1/4

I use a bubble palette with 1 drop of paint to 3-4 drops of water. This thins down the paint and allows the line work to show thru. I shade and highlight at full strength. 

When I finally decide that I'm finished with it. (I'm still debating on some additional details.) I'll mist it with a coat of Krylon #1311 Matte Finish Spray. 

There you have it friends. Go download your own copy and get to creating! Karla would love it if you would share your art. Tag her (@karladornacher) and use #starsandstripescoloring so we can all see it.

Happy 4th of July!


Inspiring Words - Inspirational Coloring Book from Zondervan {Giveaway}


30 Verses From The Bible You Can Color
Zondervan

INSPIRATION FOR EVERY AGE.
PERFECT FOR EVERY PEN.

Or marker, watercolor, or colored pencils.

Inside these pages, you'll find thirty unique and creative illustrations focusing on key verses from the Bible, each offering an opportunity to connect with Scripture while exploring your creativity. Throughout, NIV verses are paired with detailed line art, and each page is printed on high-quality, thick paper stock that won't bleed through.

Relax. Sit back. Meditate on God's Word. Then remove the completed page to display your work for even more daily inspiration.


My Thoughts

As an artist I have to say I am absolutely thrilled with the trend of meditating on Scripture through art. I particularly like the Inspiring Words inspirational coloring book because it allows you to not only express your creativity but also meditate and memorize Scripture.

There are thirty different verses. Some are well known and some are a bit more obscure, but all of them are worth pondering. The way the book is put together just begs for it to be taken apart. What I mean is that each of the prints are placed on only one side of the page leaving the back side blank. The pages are thick and do well with colored pencils, markers, watercolor, or my favorite, acrylic paint.

Each page is 8 1/2 x 11 inches so it is easy to frame. I used an 11 x 14 inch frame with an 8 x 10 mat and I love the way it looks. Now that I've tried it I plan on framing several more to place throughout the house. I love finding new ways to place Scripture in plain sight. For me it is an easy way to help me commit it to memory.

If you have a desire to experience the new Bible Art Journaling trend give this a shot. You don't have to have amazing talent. If you can color in the lines you can do this. It's such a peaceful and relaxing way to spend some quality time meditating on the Word.


Now . . . how about a GIVEAWAY?!! We loved the Inspiring Words Inspirational Coloring Book so much that we wanted to make a way for one of our readers to get their own copy. To do that we have partnered with Zondervan to give one of our readers a copy of the book.

The giveaway is open to U.S. residents and will run through midnight on Thursday, May 26, 2016. You must be at least 18 years old to enter. The winner will be contacted by email and will have forty-eight hours to claim the prize. If unclaimed, a new winner will be drawn. The winners’ entries will be verified. Please enter the contest using the Giveaway Tools form below. All entries are optional.


God Remains The Strength Of My Heart {Bible Journaling}


One of the blogs that I follow is Little House Studio. Jenn just inspires me! Not only is her art beautiful, but the words she shares on her page are ones that uplift and encourage.

A few days ago she generously shared this free printable. I couldn't resist printing it off and adding it to my Journaling Bible. I just printed it on cardstock and then cut it out and secured it with washi tape so it would be like a tip in. The size is about 5 x 5. You can download it yourself here.

I enjoy doing my own artwork in my Bible, but I also like to include work from others. It's a nice reminder to me that we aren't on this journey alone. 

Do you print out other people's artwork and include it in your Bible?

The Joy Of The Lord Is My Strength {Bible Journaling}


Several months ago I watched a series of tutorial videos by Darlene Schacht from Time Warp Wife on how to draw scrolls and roses. I bookmarked it and kept thinking I would get back to it and give it a try. Well yesterday was the day!

If you've ever wanted to draw scrolls or roses you really need to check her video series out. She makes the explanations simple and easy to follow. I practiced on scratch paper a few times and then just got brave and penciled it in my Bible. It actually turned out better than I had imagined it would! 

I followed Darlene's directions with these exceptions. I used a .01 Pigma Micron pen to go over the pencil lines and I used watercolor to paint the image. The background behind the words and flowers turned out darker than I had originally planned but I'm okay with it.

The Bible that I used is the ESV Single Column Journaling Bible.

About The Scripture

Nehemiah 8:10 falls in the middle of the chapter and actually towards the middle of the book. If you remember your Old Testament history you'll recall that Nehemiah had returned to Jerusalem to rebuild the wall that surrounds the city and protects it from its enemies.

We pick up at this verse after the wall has been rebuilt. Ezra has gathered all the people into the square for a dedication of the wall. And he has read to them the Book of the Law of Moses that the Lord had commanded Israel. (Just a side note . . . I have written in the margin of my Bible that this was the first small groups or Sunday School!) With the reading of the Law came shame and guilt upon the people. They began to mourn and weep because they knew that they had not kept these laws and it lead to the destruction of their city.

But then Nehemiah stepped forward and said, "This day is holy to the Lord your God; do not mourn or weep." Then he said to them, " Go your way. Eat the fat and drink sweet wine and send portions to anyone who has nothing ready, for this day is holy to our Lord. And do not be grieved, for the joy of the LORD is your strength." (Nehemiah 8:9-10)

I love this beautiful reminder in Scripture. Yes just like me the Israelites disobeyed the Lord's commands. But this wasn't a new revelation to God. He knew beforehand that they and I would disobey and He provided a way for us to be reconciled with Him. Nehemiah 8:10 reminds of the fact that true strength and security is found in Christ alone.


Bible Journaling Through Advent with Unwrapping the Greatest Gift by Ann Voskamp


I love the Advent season. It is such a special time that we can quiet our minds and open our hearts to the message of redemption for the whole world. In our household we begin on December 1st with a Jesse tree and use it to trace the lineage of the long expected Messiah.


Last year was the first time we used Ann Voskamp's beautiful book Unwrapping the Greatest Gift: A Family Celebration of Christmas. We used the ornaments download that corresponds with the book and crafted our own.

I collect coasters throughout the year (like the ones you get at restaurants) so I wind up with assorted shapes and sizes. For these particular ornaments I put a basecoat of black paint on the coaster and then lightly put a coat of copper paint over the top so some of the black peeked through.

I used colored pencils and markers to color the picture then cut it out and glued it on. To make it more durable I put a coat of varnish over the whole thing. To finish it off I added some decorative copper brads and a twine hanger.


This year we wanted to again use Unwrapping the Greatest Gift but I wanted to do something a bit different. I have been using my Journaling Bible to do a bit of Bible Art Journaling throughout the year and I decided that I would like to do that with the Advent readings from the book.

To do this, I again downloaded and printed off the ornament sheets that go with the book. By the way these come in two different sizes - 4 inch which is 4 per page and 2 1/2 inch which is 6 per page. I chose the 4 inch size.

I cut out the ornaments and then rounded the corners. I used colored pencils to decorate the ornaments and then I attached them to the Bible page with a strip of washi tape.


Since this is something that we do each day of Advent as a family I certainly didn't want to leave the little ones out. For those that don't do Bible Art Journaling I printed out the coloring pages that go along with Unwrapping the Greatest Gift.

Each night as we sit down to read the story for the day I pass out the coloring sheets and crayons and let the little ones color. This helps them listen and sit still plus it plants seeds that I hope will blossom in years to come.

If you are looking for a doable activity for this Advent season I would encourage you to get the book and download the resources. If you are reading this and it is past December first . . . don't fret . . . just start with the current day and go from there. You can always catch up later. Remember the season isn't about going and doing it's about quieting our hearts and minds and unwrapping the greatest Gift!

Blog Designed by: NW Designs